Documentation Index
Fetch the complete documentation index at: https://code.claude.com/docs/llms.txt Use this file to discover all available pages before exploring further.
Interface gallery for mods
See the interface elements a Claude Code mod can draw, such as text, buttons, fields, Markdown, code, and diffs, with sample code and terminal screenshots.
A mod draws its interface from elements: text, boxes, buttons, fields, and a few that format content for you. The samples here show the code that draws an element, and most come with a screenshot of the result in a terminal pane, so you can pick an element by how it looks.
To learn how drawing works, start with Draw in the interface. For the main props and which apps draw each element, see the elements reference. The type declarations list every prop.
Try a sample
The samples on this page are snippets, not whole mods. Each one is the code for one element and anything nested inside it.
To see a sample in your own terminal, create the small mod in these steps and paste the sample into it. The mod adds a /gallery command that opens a pane and draws the sample there. A pane is a sidebar beside the transcript in a wide fullscreen terminal, or a framed region above the prompt otherwise.
gallery with .claude-plugin and hooks directories inside it. Create a mod explains the files.
Save the manifest as `gallery/.claude-plugin/plugin.json`:

```json gallery/.claude-plugin/plugin.json theme={null}
{
  "name": "gallery",
  "version": "0.1.0",
  "description": "Opens a pane that draws one sample",
  "author": { "name": "Your Name" }
}
```

Name your entry point in `gallery/hooks/hooks.json`:

```json gallery/hooks/hooks.json theme={null}
{
  "modules": ["./register.js"]
}
```

Save the code as `gallery/hooks/register.js`. It adds a `/gallery` command that opens a pane, and draws `Plain text` in that pane:

```javascript gallery/hooks/register.js theme={null}
// Stands in for your own callback in the samples that take one
const noop = () => {}
// The Select sample keeps its choice here
let picked = 'md'

// The Raster sample packs its cells with this function
const DEFAULT_COLOR = 0x01000000
function cellsOf(rows) {
  const numbers = rows.flat().flatMap(([char, color]) => [char.codePointAt(0), color, DEFAULT_COLOR])
  return new Uint8Array(Uint32Array.from(numbers).buffer).toBase64()
}

export function register(on) {
  on('session.start', async ($, e, next) => {
    await $.command.register({ name: 'gallery', description: 'Open the sample pane' })
    return next(e)
  })

  on('command.run', { command: 'gallery' }, async ($) => {
    await $.ui.open({ id: 'gallery', focus: true, closeOnEscape: true })
    return {}
  })

  on('ui.render', { component: 'Pane' }, async ($, e, next) => {
    if (e.requestId !== 'gallery') return next(e)
    const { Box, Text, Button, Input, Select, Link, Markdown, Code, Raster, Svg } = $.ui.resolve(e)
    // Replace the element after return with a sample
    return Text({ children: ['Plain text'] })
  })
}
```
gallery:
```bash theme={null}
claude --plugin-dir ./gallery
```

At the Claude Code prompt, run `/gallery`. A pane opens with `Plain text` in it.
register.js, paste it over Text({ children: ['Plain text'] }), so that it follows return, and save the file. Claude Code reloads the module each time you save, so run /gallery again to see the new sample.
Pick an element
The samples are grouped by what you want to put on screen:
- Show text:
Text,Markdown, andLink - Show code and changes:
Code - Arrange elements:
Box - Take input:
Button,Input, andSelect - Draw pictures:
Raster,Svg,Image, andClient
Show text
Three elements put words on screen: Text for your own styling, Markdown for content that's already formatted, and Link for a URL.
Text
Text draws a string with the styles you give it. This sample shows one line for each style:
```javascript theme={null} Box({ flexDirection: 'column', children: [ Text({ children: ['Plain text'] }), Text({ bold: true, children: ['bold'] }), Text({ italic: true, children: ['italic'] }), Text({ underline: true, children: ['underline'] }), Text({ strikethrough: true, children: ['strikethrough'] }), Text({ dimColor: true, children: ['dimColor'] }), Text({ inverse: true, children: ['inverse'] }), Text({ color: 'red', children: ["color: 'red'"] }), Text({ backgroundColor: 'blue', children: ["backgroundColor: 'blue'"] }), ], })
<img src="https://mintcdn.com/claude-code/EXkwf0kKMewZsyod/images/mods-el-text-light.png?fit=max&auto=format&n=EXkwf0kKMewZsyod&q=85&s=90724ce3953d9347b61b6a9266fda451" className="dark:hidden" alt="A pane with nine lines of text, each named for its style: plain, bold, italic, underline, strikethrough, dimColor in gray, inverse, color red, and backgroundColor blue." width="1872" height="490" data-path="images/mods-el-text-light.png" />

<img src="https://mintcdn.com/claude-code/EXkwf0kKMewZsyod/images/mods-el-text-dark.png?fit=max&auto=format&n=EXkwf0kKMewZsyod&q=85&s=790dd3465e06db0842639d0d8fcbbc96" className="hidden dark:block" alt="A pane with nine lines of text, each named for its style: plain, bold, italic, underline, strikethrough, dimColor in gray, inverse, color red, and backgroundColor blue." width="1872" height="490" data-path="images/mods-el-text-dark.png" />

`dimColor` draws the text in gray. `backgroundColor` fills only as wide as the text.

### `Markdown`

`Markdown` formats text the way Claude's replies are formatted. Pass the content in `text`, not in `children`:

```javascript theme={null}
Markdown({
  text: '## Release notes\n\nThis build has **two** fixes and one `flag`:\n\n- Faster start\n- Fewer prompts\n\n> Quoted text',
})
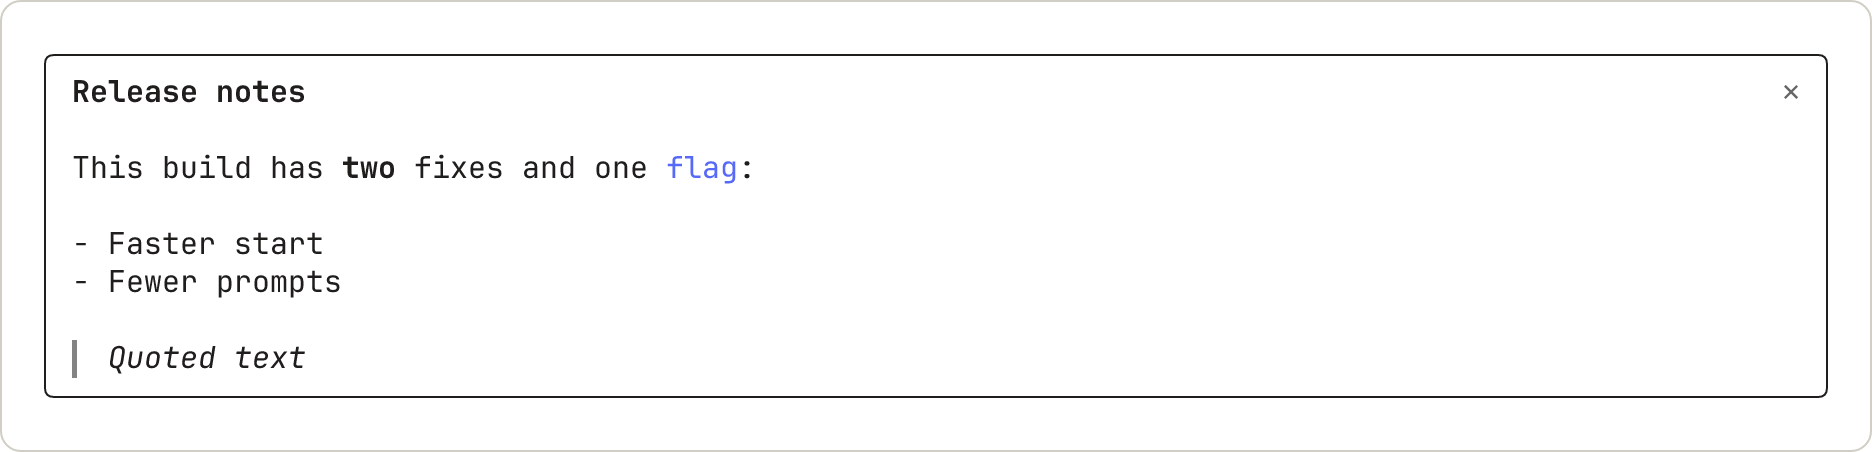
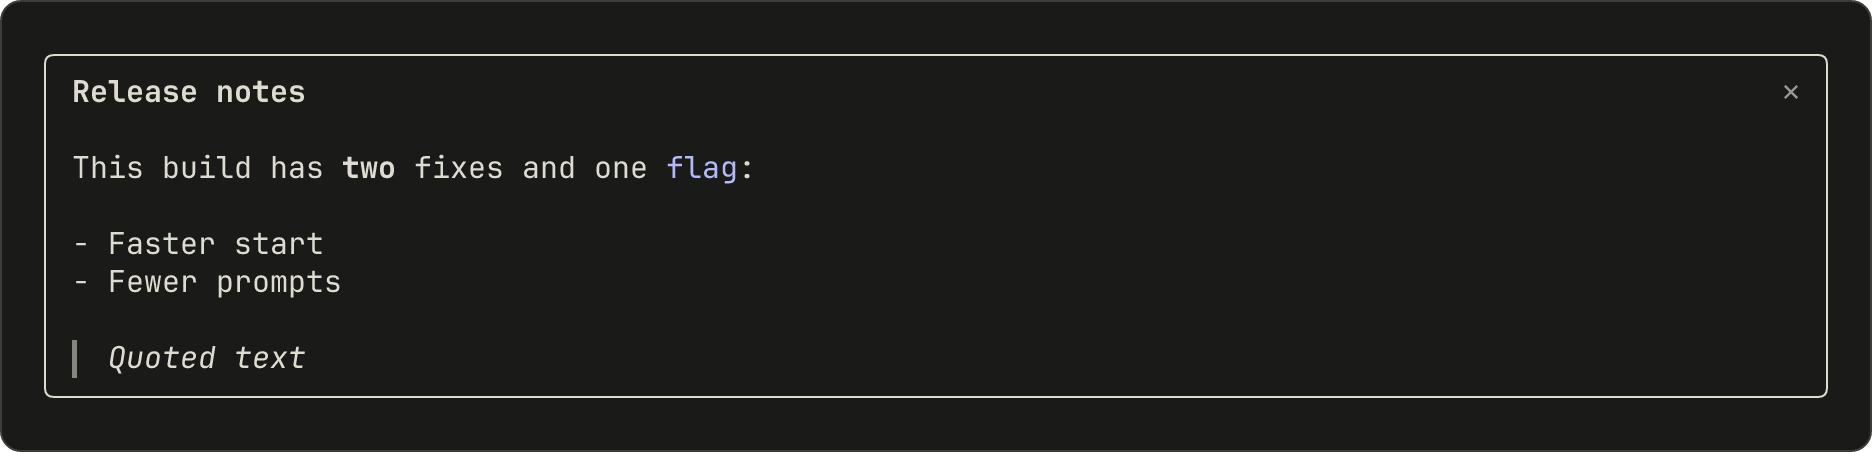
A heading draws in bold without its # marks. Inline code draws in color without its backticks. A quote draws in italics with a bar on its left.
Link
Link draws a label followed by its URL:
```javascript theme={null} Link({ href: 'https://code.claude.com/docs', label: 'Claude Code docs' })
<img src="https://mintcdn.com/claude-code/EXkwf0kKMewZsyod/images/mods-el-link-light.png?fit=max&auto=format&n=EXkwf0kKMewZsyod&q=85&s=8217bd2dfb561a8ba57023c6d89ea977" className="dark:hidden" alt="A pane with one line: the label Claude Code docs, then the URL in gray." width="1872" height="186" data-path="images/mods-el-link-light.png" />

<img src="https://mintcdn.com/claude-code/EXkwf0kKMewZsyod/images/mods-el-link-dark.png?fit=max&auto=format&n=EXkwf0kKMewZsyod&q=85&s=cd32f222a7d3530b070f58f5f189a1f8" className="hidden dark:block" alt="A pane with one line: the label Claude Code docs, then the URL in gray." width="1872" height="186" data-path="images/mods-el-link-dark.png" />

The terminal draws the URL as text after the label. Whether a click opens it depends on the user's terminal.

## Show code and changes

`Code` draws source text with Claude Code's own syntax colors, or a diff.

### `Code`

Name the `language`, or pass a `path` for Claude Code to infer it from. With `startLine`, the lines are numbered from that number:

```javascript theme={null}
Code({
  language: 'javascript',
  startLine: 1,
  source: "const name = 'mods'\nconsole.log('hello ' + name)",
})


The colors come from the user's theme.
Code as a diff
With format: 'diff', source is one or more unified diff hunks:
```javascript theme={null} Code({ format: 'diff', source: '@@ -1,3 +1,3 @@\n # Mods\n-A mod is a plugin.\n+A mod is a plugin that runs code.\n Read on.', })
<img src="https://mintcdn.com/claude-code/EXkwf0kKMewZsyod/images/mods-el-diff-light.png?fit=max&auto=format&n=EXkwf0kKMewZsyod&q=85&s=4f12c9f7229ceccd9b4f47479a7235dd" className="dark:hidden" alt="A pane with a four-line diff. The removed line is shaded red and the added line green, each with its line number. In the added line, the words that runs code have a stronger shade." width="1872" height="300" data-path="images/mods-el-diff-light.png" />

<img src="https://mintcdn.com/claude-code/EXkwf0kKMewZsyod/images/mods-el-diff-dark.png?fit=max&auto=format&n=EXkwf0kKMewZsyod&q=85&s=9db96f34381bac8bebc32d41859b8808" className="hidden dark:block" alt="A pane with a four-line diff. The removed line is shaded red and the added line green, each with its line number. In the added line, the words that runs code have a stronger shade." width="1872" height="300" data-path="images/mods-el-diff-dark.png" />

Claude Code draws line numbers in place of the `@@` line. Where a removed line and an added line are alike, the words that changed get a stronger shade.

## Arrange elements

### `Box`

`Box` lays out what's inside it in a row or a column, and can draw a border. This sample puts a row of words above a bordered box:

```javascript theme={null}
Box({
  flexDirection: 'column',
  gap: 1,
  children: [
    Box({
      flexDirection: 'row',
      columnGap: 4,
      children: [Text({ children: ['a row'] }), Text({ children: ['of three'] }), Text({ children: ['items'] })],
    }),
    Box({
      borderStyle: 'round',
      paddingX: 1,
      children: [Text({ children: ["borderStyle: 'round'"] })],
    }),
  ],
})


The border stretches to the width of the pane.
Take input
Button, Input, and Select are controls: the user moves between them with Tab and uses the one that has the focus. Keyboard focus and hotkeys covers which keys reach them.
Opening a pane with focus: true gives the pane keyboard focus. Typed letters reach an Input once it has the focus, so add autoFocus: true to a field that should take typing as soon as the pane opens.
Button
A button runs onPress. This sample shows the default form, a plain button with a hotkey, and a dim one:
```javascript theme={null} Box({ flexDirection: 'column', children: [ Button({ key: 'save', label: 'Save', onPress: noop }), Button({ key: 'next', label: 'Next', hotkey: 'n', plain: true, onPress: noop }), Button({ key: 'skip', label: 'Skip', dimColor: true, onPress: noop }), ], })
<img src="https://mintcdn.com/claude-code/EXkwf0kKMewZsyod/images/mods-el-button-light.png?fit=max&auto=format&n=EXkwf0kKMewZsyod&q=85&s=8c638c15e12d9736f327dfcaa797b512" className="dark:hidden" alt="A pane with three buttons, one per line: Save in brackets, n: Next without brackets and with the n in color, and Skip in brackets in gray." width="1872" height="262" data-path="images/mods-el-button-light.png" />

<img src="https://mintcdn.com/claude-code/EXkwf0kKMewZsyod/images/mods-el-button-dark.png?fit=max&auto=format&n=EXkwf0kKMewZsyod&q=85&s=6a88a1fe18ba63b050366dcfab14be45" className="hidden dark:block" alt="A pane with three buttons, one per line: Save in brackets, n: Next without brackets and with the n in color, and Skip in brackets in gray." width="1872" height="262" data-path="images/mods-el-button-dark.png" />

A button that has the focus draws in inverse video. Here the user has pressed Tab twice:

<img src="https://mintcdn.com/claude-code/EXkwf0kKMewZsyod/images/mods-el-button-plain-focused-light.png?fit=max&auto=format&n=EXkwf0kKMewZsyod&q=85&s=a6224e58d10752a894615047d9824ad9" className="dark:hidden" alt="The same three buttons, with the second one, n: Next, drawn in inverse video." width="1872" height="262" data-path="images/mods-el-button-plain-focused-light.png" />

<img src="https://mintcdn.com/claude-code/EXkwf0kKMewZsyod/images/mods-el-button-plain-focused-dark.png?fit=max&auto=format&n=EXkwf0kKMewZsyod&q=85&s=9aeb7145615e77c84e7436180ed69e86" className="hidden dark:block" alt="The same three buttons, with the second one, n: Next, drawn in inverse video." width="1872" height="262" data-path="images/mods-el-button-plain-focused-dark.png" />

### `Input`

An `Input` is a one-line text field that runs `onSubmit` when the user presses Enter:

```javascript theme={null}
Input({
  key: 'title',
  label: 'Title',
  placeholder: 'Type a title and press Enter',
  value: '',
  submitLabel: 'save',
  onSubmit: noop,
})
Without the focus, the field shows its label and its placeholder:


With the focus, the label turns bold, a cursor appears, and the submitLabel shows after ⏎:


Typing replaces the placeholder:


Select
A Select lets the user pick one of several options, and runs onSelect with the option's value:
```javascript theme={null} Select({ key: 'format', label: 'Format', value: picked, options: [ { value: 'md', label: 'Markdown' }, { value: 'html', label: 'HTML' }, { value: 'txt', label: 'Plain text' }, ], onSelect: (value) => { picked = value }, })
Closed, it shows its label and the current option:

<img src="https://mintcdn.com/claude-code/EXkwf0kKMewZsyod/images/mods-el-select-light.png?fit=max&auto=format&n=EXkwf0kKMewZsyod&q=85&s=4e3b18268ffd87d2cad06442e6d661a9" className="dark:hidden" alt="A pane with one line: the label Format, the current option Markdown, and a small down arrow." width="1872" height="186" data-path="images/mods-el-select-light.png" />

<img src="https://mintcdn.com/claude-code/EXkwf0kKMewZsyod/images/mods-el-select-dark.png?fit=max&auto=format&n=EXkwf0kKMewZsyod&q=85&s=1e329e6aee748c2dd70e92dbe4960de0" className="hidden dark:block" alt="A pane with one line: the label Format, the current option Markdown, and a small down arrow." width="1872" height="186" data-path="images/mods-el-select-dark.png" />

Open, it lists its options and marks one:

<img src="https://mintcdn.com/claude-code/EXkwf0kKMewZsyod/images/mods-el-select-moved-light.png?fit=max&auto=format&n=EXkwf0kKMewZsyod&q=85&s=deb6ce0a49d213235feedaa79ac658c0" className="dark:hidden" alt="The picker open, with its three options listed under the label. The second option, HTML, is drawn in inverse video." width="1872" height="300" data-path="images/mods-el-select-moved-light.png" />

<img src="https://mintcdn.com/claude-code/EXkwf0kKMewZsyod/images/mods-el-select-moved-dark.png?fit=max&auto=format&n=EXkwf0kKMewZsyod&q=85&s=d69edeecd4f97dad4bdb39b908e3d98e" className="hidden dark:block" alt="The picker open, with its three options listed under the label. The second option, HTML, is drawn in inverse video." width="1872" height="300" data-path="images/mods-el-select-moved-dark.png" />

After the user picks an option, the list closes:

<img src="https://mintcdn.com/claude-code/EXkwf0kKMewZsyod/images/mods-el-select-picked-light.png?fit=max&auto=format&n=EXkwf0kKMewZsyod&q=85&s=f065ab5bc479868f03088dc736f17097" className="dark:hidden" alt="The picker closed again, now showing HTML as the current option." width="1872" height="186" data-path="images/mods-el-select-picked-light.png" />

<img src="https://mintcdn.com/claude-code/EXkwf0kKMewZsyod/images/mods-el-select-picked-dark.png?fit=max&auto=format&n=EXkwf0kKMewZsyod&q=85&s=f084630e325825f3831219215a6a595e" className="hidden dark:block" alt="The picker closed again, now showing HTML as the current option." width="1872" height="186" data-path="images/mods-el-select-picked-dark.png" />

## Draw pictures

### `Raster`

A `Raster` is a grid of colored character cells, for a heat map, a sparkline, or a game board. The terminal draws it. This sample uses the `cellsOf` function in the starter module, which packs the cells into the string a `Raster` takes. [Draw a grid of colored cells](/docs/en/plugins/mods/interface#draw-a-grid-of-colored-cells) explains it:

```javascript theme={null}
Raster({
  key: 'grid',
  columns: 3,
  rows: 2,
  cells: cellsOf([
    [['█', 0x2e7d32], ['█', 0xf9a825], ['█', 0xc62828]],
    [['█', 0x2e7d32], ['█', 0x2e7d32], ['█', 0xf9a825]],
  ]),
})


A Raster rounds each color to a smaller palette, so 0x2e7d32 draws as #337733.
Svg
An Svg draws an SVG document in the Desktop app:
javascript theme={null}
Svg({
  alt: 'Three bars of rising height',
  width: 120,
  height: 60,
  source:
    '<svg xmlns="http://www.w3.org/2000/svg" viewBox="0 0 120 60"><rect x="10" y="40" width="20" height="20" fill="#2e7d32"/><rect x="50" y="25" width="20" height="35" fill="#f9a825"/><rect x="90" y="5" width="20" height="55" fill="#c62828"/></svg>',
})
In the terminal, a pane that returns only an Svg opens empty. To draw something else there, check e.surface and return a different tree.
Image and Client
Two more elements have no sample here. Image draws a PNG or raw pixels in the terminal. Client is a region that a second file of yours draws, for animation and pointer input. The elements reference lists their props.
See where a mod can draw
The samples all draw in a pane. A mod can also draw in other places, and call Claude Code to show something for it:
- Pane and band: Pick where to draw
- Claude Code's own rows, such as the spinner: Change what Claude Code already draws
- Toast, status line, and log line: Show something without starting a turn
- Question dialog: Hold a tool call until the user decides
Next steps
- Draw in the interface: build a pane with tabs, step by step
- Test a drawing: press your buttons from a test
- Elements reference: each element's main props and the apps that draw it